Article: Tile Trim for Porcelain Tiles That Lasts
Tile Trim for Porcelain Tiles That Lasts
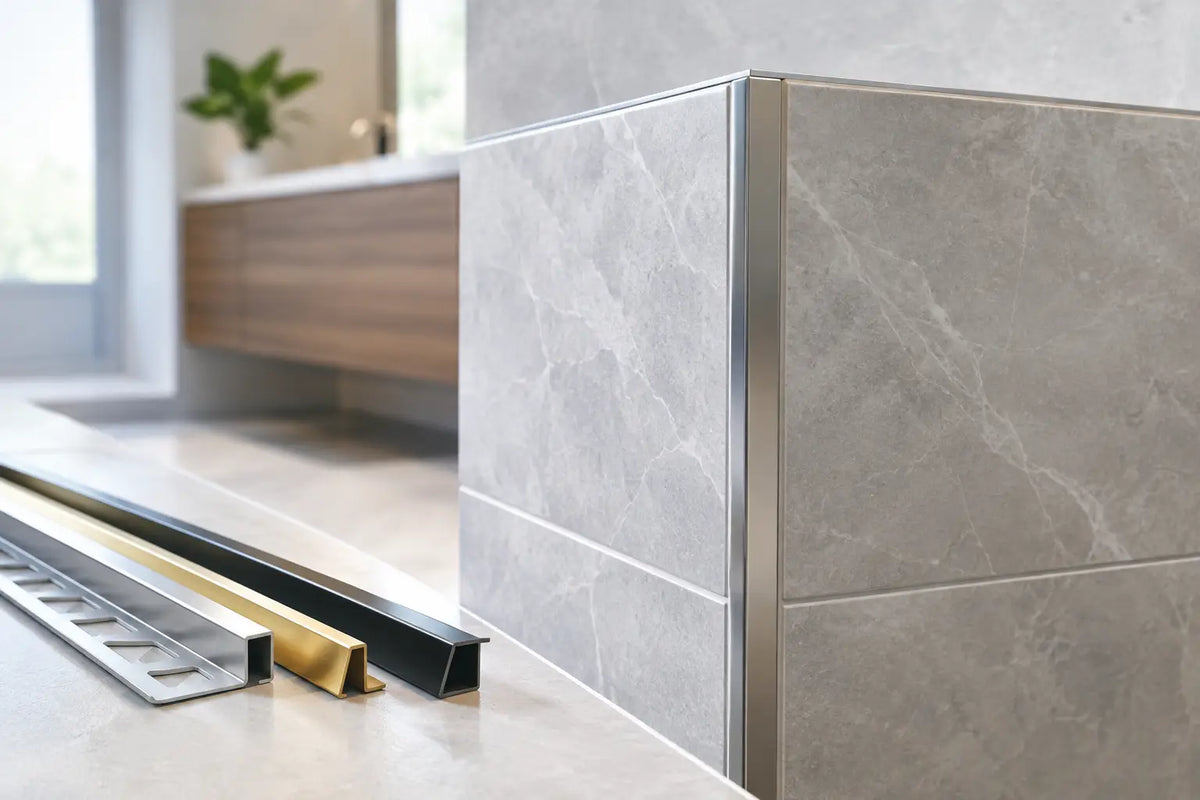
A beautifully tiled wall can still look unfinished if the exposed edges are left vulnerable. Tile trim for porcelain tiles creates the crisp, protected finish that turns a bathroom niche, shower return, kitchen splashback or tiled floor transition into a considered part of the design. It also protects cut tile edges from knocks, chips and moisture exposure - a practical detail that matters as much in a busy family home as it does in a hotel bathroom or commercial washroom.
Porcelain is dense, durable and available in an exceptional range of stone, concrete, marble and decorative effects. Its strength does not remove the need for a proper edge treatment. The right trim should suit the tile thickness, the room’s conditions and the visual character of the scheme, while allowing the installer to achieve straight, consistent lines.
Why porcelain tile edges need a finishing profile
Factory edges on rectified porcelain tiles can look remarkably sharp, but cut edges are different. They may be exposed at an external corner, around a window reveal, at the top of a half-height tiled wall or along the open side of a tiled floor. Even where the cut is clean, an unprotected edge is more susceptible to impact and can interrupt the continuity of the finish.
A trim profile covers or frames that edge. On external wall corners, it creates a resilient line where two tiled surfaces meet. At the end of a tiled run, it provides a deliberate border rather than an abrupt stop. Floor profiles can also manage changes in level or create a neat junction between porcelain and another flooring material.
There are alternatives. A mitred porcelain edge can produce a very refined, almost monolithic look, particularly with large-format marble-effect tiles. However, mitring needs precise cutting, careful handling and an experienced installer. It can also leave a more delicate arris at a high-impact corner. Bullnosed tiles are another option, but matching pieces are not offered in every collection. Trim is often the most reliable and flexible specification choice.
Choosing tile trim for porcelain tiles
Start with the tile’s actual thickness, not just the nominal size shown on the box. A 10 mm porcelain tile may vary slightly, and adhesive coverage adds depth beneath it. As a general rule, select a trim depth that matches the tile thickness or is marginally deeper. A profile that sits too low can leave the tile edge proud and exposed; one that is noticeably too deep can look heavy and collect dirt at the edge.
For large-format porcelain, check the build-up especially carefully. Wall preparation, adhesive bed thickness and any levelling system can affect the finished position. On floors, the trim also needs to suit the traffic level and any adjoining surface heights. This is one of those small decisions best made with an actual tile sample and a section detail rather than by colour alone.
The profile shape changes the finished look. Square-edge trims give a clean, architectural line and suit contemporary concrete, stone and plain matt porcelain. Round-edge profiles soften an outside corner and can be a sensible choice where people are likely to brush past it. Slimline finishing profiles provide a discreet end detail for splashbacks and feature panels, while wider border trims make more of a decorative statement.
For floor transitions, a purpose-made movement or transition profile is preferable to trying to adapt a wall trim. It is designed to protect the tile edge while accommodating the meeting point between surfaces. Where underfloor heating, wide tiled expanses or structural movement are involved, movement joints must be planned correctly. A trim is not a substitute for movement provision within the installation.
Selecting the right trim material
The material should be chosen for performance first, then appearance. In a dry, low-impact decorative setting, several options may work well. In a wet room, shower enclosure, entrance or commercial environment, corrosion resistance and durability become more significant.
Aluminium trims
Aluminium is a popular choice for internal walls and many residential applications. It is light, straightforward to work with and offered in finishes from polished chrome-look and brushed metallic tones to black, white and powder-coated colours. A black square-edge trim alongside pale stone-effect porcelain can give a sharp contemporary frame, while brushed brass can bring warmth to veined marble-look tiles.
Not all aluminium finishes are equally suited to every environment. For consistently wet areas, cleaning regimes and exposure to chemicals should be considered carefully. The profile should also be protected during grouting and final cleaning to avoid marking a decorative face.
Stainless steel trims
Stainless steel is a strong option for demanding areas, including wet zones, heavily used floors and commercial projects. Its resistance to corrosion and impact makes it particularly suitable for shower areas, communal spaces and schemes where longevity is central to the specification.
The visual effect is purposeful and clean. Brushed stainless steel works naturally with modern sanitaryware, appliance finishes and neutral porcelain, although it can feel more technical than a colour-matched or brass-effect profile. It is a sensible choice when the installation needs to work hard as well as look polished.
PVC trims
PVC profiles are cost-effective, easy to cut and available in a useful range of colours. They can be appropriate for lower-impact wall applications and straightforward domestic projects, particularly where a close colour match is preferred. Their limitations are worth recognising: they are generally less resistant to abrasion and impact than metal profiles and may not deliver the same premium finish beside high-end porcelain.
For a design-led renovation or a frequently used commercial setting, aluminium or stainless steel will often provide a more durable, refined result. PVC remains a practical option where budget and application make it appropriate.
Match the finish to the wider scheme
Trim does not have to disappear. It can either blend into the tile or act as a fine design accent. The best approach depends on how much definition the space needs.
A colour-matched trim creates a calm edge around a soft grey, cream or terrazzo-effect porcelain wall. This works well when the tile itself is the focal point, such as a richly veined marble effect or a patterned decorative surface. In contrast, a contrasting trim can introduce structure. Matt black profiles complement black brassware and shower frames; brushed brass can echo taps, lighting and handles; chrome-look trims sit comfortably with polished bathroom fittings.
Consider sheen as well as colour. Highly polished trim beside a matt porcelain tile creates intentional contrast, but it will draw the eye to every edge. A brushed or satin profile is often more forgiving and can better suit tactile stone-effect tiles. Samples are particularly useful here, as metallic finishes can look markedly different under showroom lighting, daylight and warm bathroom lighting.
Planning trims before installation
Trim should be selected during tile layout planning, not when the tiler reaches the last exposed edge. Establish where the tiled area starts and finishes, which corners will be external, and whether trims will align with grout joints, niches, shelves or shower screens. A well-planned profile should look integral to the layout rather than added as an afterthought.
Measure every exposed run and allow a little contingency for cuts and site adjustments. Mitred profile corners can be neat, but preformed internal and external corner pieces may offer a more consistent result for some systems and reduce sharp cut ends. The installer should confirm which approach suits the profile and design.
Trims are normally fixed as the tiles are installed. The perforated anchoring leg is bedded into adhesive, with the tile set alongside it and grout finishing the joint. It should not be surface-fixed over completed tiles unless the product is specifically designed for that purpose. Correct substrate preparation, a suitable adhesive and appropriate grout remain essential; a premium trim cannot compensate for poor installation practice.
In showers and wet rooms, remember that trim is a finishing component, not waterproofing. The waterproofing system, tanking details, falls and sealant joints must all be specified correctly before tiling begins. Around movement-prone junctions, use the appropriate flexible sealant rather than rigid grout.
A small detail with a lasting effect
The most successful porcelain installations are resolved at the edges as carefully as they are across the main tiled surface. Choosing the correct depth, profile, material and finish protects the investment in your tiles and gives the room a finished, professional character. When selecting tiles, grout and installation materials, put a sample of the chosen trim alongside them - it is the simplest way to see whether the final detail will support the scheme you have in mind.