Article: Tile Spacers Versus Levelling Clips Compared
Tile Spacers Versus Levelling Clips Compared
A large-format porcelain floor can look beautifully calm and expensive, yet a single proud edge between two tiles can catch the light, feel sharp underfoot and undermine the whole result. That is why the choice between tile spacers versus levelling clips matters well before adhesive is mixed. They solve related but different installation problems, and the best projects often use both.
For homeowners, the decision affects the finish of a new bathroom, kitchen or hallway. For installers and specifiers, it affects fitting speed, acceptable tolerances and the risk of remedial work. The right accessory depends on tile format, joint width, substrate condition and the standard of finish expected.
Tile spacers versus levelling clips: the key difference
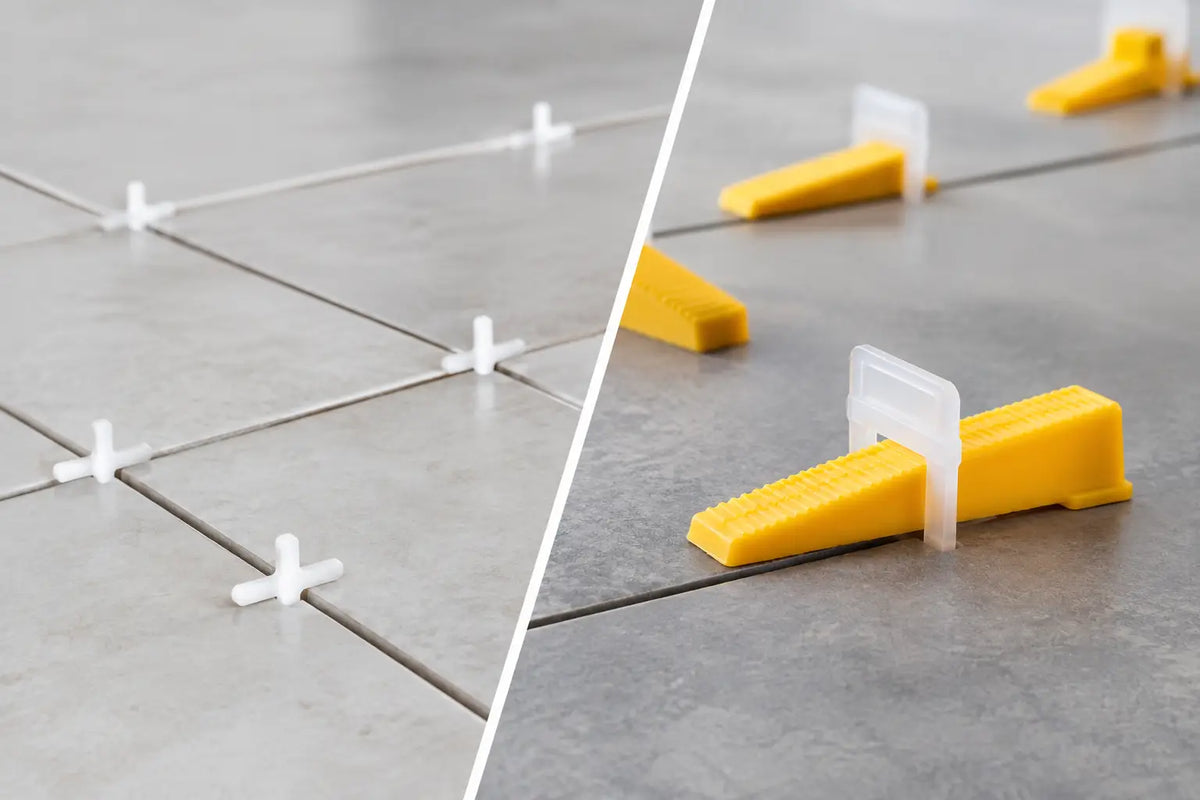
Tile spacers are small, fixed-size pieces placed between tiles to maintain an even grout joint. Their purpose is straightforward: they help establish consistent spacing and keep a layout looking ordered across a wall or floor. Available in a range of widths, they are a familiar choice for ceramic wall tiles, mosaics and many standard-format porcelain tiles.
Levelling clips form part of a tile levelling system. A clip is positioned beneath the tile edges, then tightened with a compatible wedge or cap. As the system is tensioned, it draws adjacent tiles into the same plane, helping to reduce lippage - the height difference at the edge of neighbouring tiles. The clip also creates a grout joint, although the width is determined by the particular system.
Neither product corrects a poor substrate. Spacers cannot make uneven tiles level, and clips cannot pull a tile floor flat over dips, humps or an inadequately prepared screed. Preparation remains the foundation of a professional installation.
When tile spacers are the right choice
Spacers are efficient, economical and entirely suitable for a wide range of work. They are particularly useful where tiles are smaller, the background is flat and the installer is working with a regular joint width. A carefully set-out wall of metro tiles, for example, may need nothing more complicated than quality spacers, appropriate adhesive and attentive fixing.
They also offer flexibility. A designer may specify a narrow joint for rectified porcelain, a more visible joint to frame handmade-effect ceramics, or a wider joint for tiles with naturally irregular edges. Spacers are available to support those decisions without locking the project into one levelling system’s joint size.
For wall tiling, spacers are often the practical default because gravity and a sound setting-out approach do much of the work. They can be used in cross joints, T-joints and around feature areas to preserve the intended grid. On floors, they remain a sensible option for smaller formats where lippage is less likely to become visually prominent.
That said, spacers require the installer to control tile height manually. On a floor with broad porcelain planks or large square tiles, maintaining a flush surface by eye alone becomes more demanding. This is where levelling clips earn their place.
Joint width is a design and technical decision
Do not choose a spacer size simply because it is the smallest available. Tile dimensions can vary slightly between pieces and batches, particularly with non-rectified, handmade-look or textured products. A joint that is too tight may make those variations difficult to manage and can leave the finished grid looking less consistent.
Rectified porcelain tiles are cut after firing for more precise edges and can often be installed with a narrower joint. Even then, a grout joint is still needed. It accommodates minor variation, helps achieve a clean layout and allows grout to protect the tile edges and finish the surface properly.
When levelling clips are worth specifying
Levelling clips are most valuable with large-format tiles, rectified porcelain, long plank formats and areas where light will reveal even minor differences in level. A low sun across a kitchen floor, downlights in a hotel reception or wall lighting beside a shower enclosure can all accentuate lippage.
They are especially helpful when laying tiles measuring 600 x 600mm and above, although size alone is not the rule. A 200 x 1200mm wood-effect porcelain plank may benefit more from a levelling system than a smaller square tile because its length can exaggerate any unevenness in the background or natural tile bow.
The system applies controlled pressure across neighbouring tiles while the adhesive cures. This gives the installer a more consistent surface plane and can reduce the need to repeatedly lift and re-bed tiles. On larger residential and commercial areas, that control can support both finish quality and installation efficiency.
Clips are not a substitute for experience. Excessive tension can disturb adhesive coverage, particularly if a tile has not been properly bedded. They must be used with the correct trowel, adhesive consistency and bedding technique. For floor tiles, full adhesive coverage is essential, with no voids that could compromise the installation under load.
Understand the limitations of a levelling system
A levelling system does not flatten an uneven floor. If a substrate has significant deviation, it should be assessed and made suitable before tiling, using the appropriate preparation materials and methods. Trying to force tiles over a hump or pull them into a hollow can lead to poor adhesive contact, cracked tiles or a floor that still looks uneven once complete.
The system also cannot remove inherent bowing from long tiles. Plank tiles are often laid with an offset pattern, but a 50 per cent brick bond can place the highest point of one tile beside the lowest point of another. Depending on the product’s allowable warpage and the light in the room, a reduced offset such as one third can produce a better visual result. Always check the manufacturer’s fitting guidance before setting out.
Finally, clips are generally single-use components. The wedges or reusable caps may be retained, but clips are designed to break away after the adhesive has set. That makes them more expensive than basic spacers, so they should be selected where their performance benefit justifies the added material cost.
Using spacers and levelling clips together
For many porcelain floor installations, this is not an either-or decision. Levelling clips establish the joint at the points where they are fitted and manage lippage, while additional spacers can help maintain alignment elsewhere, particularly at corners, changes of direction and more complex patterns.
The important point is compatibility. A clip system creates a specific joint width, so any supplementary spacers should match it. Mixing 2mm clips with 3mm spacers, for example, can create an inconsistent grid that remains visible after grouting.
Set out the room before committing to the first tile. Check that cuts at opposing walls are balanced, identify focal lines and decide how doorways, islands and feature walls will read. A levelling system helps control the surface, but it will not rescue a rushed layout.
Choosing for walls, floors and tile types
For a standard ceramic bathroom wall, spacers are usually sufficient when the wall is sound and flat. They allow the joint width to complement the tile style, whether the aim is crisp and contemporary or softly traditional.
For large-format porcelain wall tiles, clips can be useful, particularly around shower areas where reflected light makes tile edges more noticeable. Care is needed not to over-tighten the system or allow tiles to slide before the adhesive takes hold. Suitable wall adhesive and sensible working areas are essential.
For porcelain floor tiles, levelling clips are a strong consideration where tiles are large, long or rectified. They are also valuable in open-plan spaces where the floor is seen as one continuous surface. Smaller quarry-style, encaustic-effect or patterned tiles may be more straightforward with spacers alone, provided the substrate is prepared correctly.
Natural stone requires additional judgement. Thickness and edge variation can be greater than with calibrated porcelain, and the correct joint width, adhesive and sealing approach depend on the stone itself. Spacers may be more appropriate where a deliberately natural finish is wanted, while levelling systems can assist with selected calibrated stone formats. Product-specific advice should guide the specification.
Practical buying and preparation checks
Before ordering installation materials, confirm the tile’s nominal size, whether it is rectified, the recommended joint width and the intended layout. Measure the area accurately and allow for cuts, pattern matching and sensible wastage. For larger projects, ordering enough tiles from the same batch is also important for consistency of shade and calibre.
Choose a levelling system rated for the thickness of the tile being fitted, and make sure the clips, wedges or caps belong to the same system. Alongside spacers or clips, allow for the correct primer where required, suitable adhesive, grout, trims and movement joints. These are not secondary details: they protect the finish and help the installation perform as intended.
Smart Tiles can help bring those elements together, from selecting a design-led wall or floor tile to matching it with the practical materials needed for a confident installation.
The best choice is usually the one that respects the tile, the substrate and the room’s lighting. Use spacers where consistent joints are the main requirement; specify levelling clips where controlling lippage will make a meaningful difference. Give preparation the same attention as the visible surface, and the finished tiles will have the precision and presence the project deserves.