Article: How to Waterproof Tiled Showers Correctly
How to Waterproof Tiled Showers Correctly
A shower can look beautifully finished on day one and still fail behind the tiles months later. Knowing how to waterproof tiled showers properly is what protects the structure beneath the surface, whether you are fitting a refined porcelain bathroom in a home or specifying multiple en-suites for a commercial scheme.
Tiles and grout are water-resistant finishes, not a waterproofing system. Water can pass through grout joints, small cracks, perimeter seals and penetrations around mixers or shower valves. The waterproof layer must sit directly beneath the tiles and direct any moisture safely back into the shower area.
Start with the right shower construction
The correct waterproofing approach depends on the shower design. A standard shower tray with tiled walls needs a reliable wall tanking system, particularly around the valve, riser rail and tray junction. A fully tiled wet room requires a more comprehensive system across the floor and walls, integrated with the drain and floor falls.
Before selecting membranes, check the substrate. Solid masonry walls may be suitable once they are clean, sound and flat. Stud walls need an appropriate tile backer board or a suitably prepared plasterboard system where the manufacturer permits it. Standard plasterboard is not a dependable choice inside a shower enclosure unless it is specifically part of an approved waterproofing build-up.
Cement-based and foam-core tile backer boards provide a stable base, but they should not be treated as a complete answer on their own. Board joints, fixings, corners and service penetrations still need sealing. On timber floors, rigidity matters just as much as water protection. Excess movement can crack grout, break seals and compromise a waterproof membrane over time.
Choose a compatible tanking system
For most domestic tiled showers, a liquid-applied tanking kit or sheet membrane system is the practical choice. Both can perform very well when installed correctly, but the detail work makes the difference.
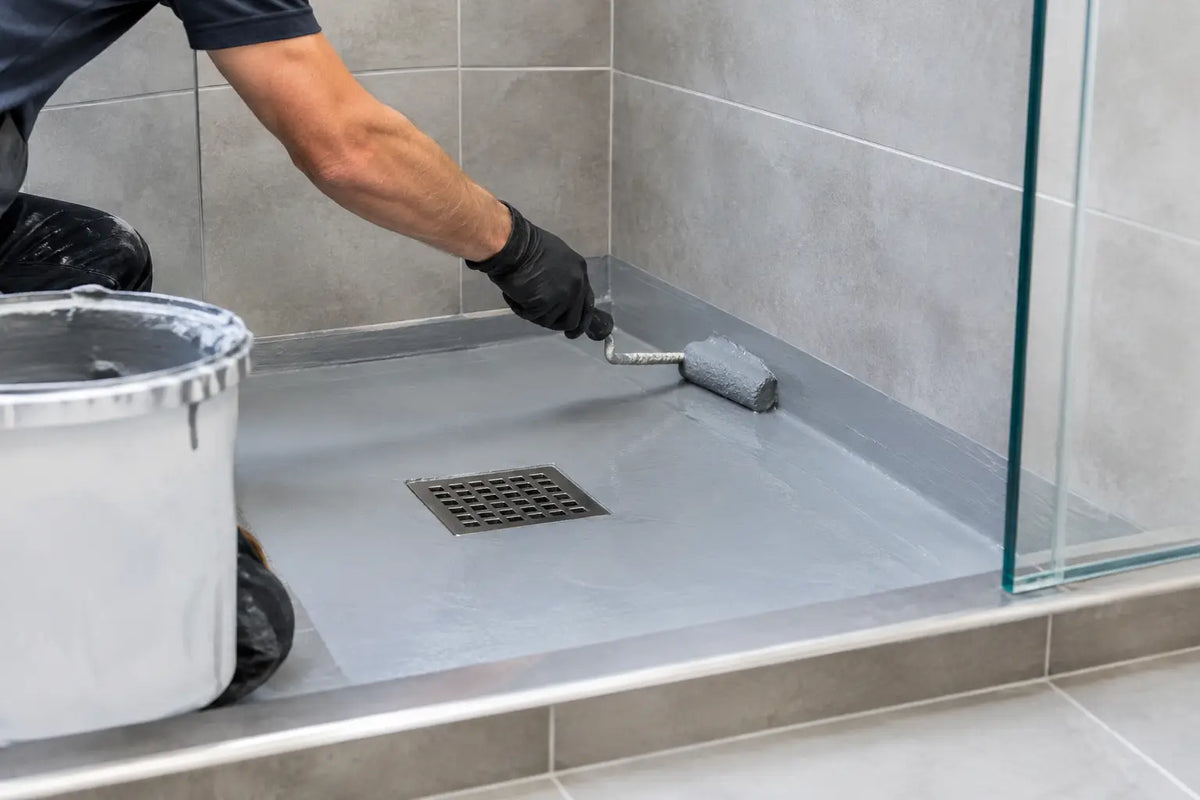
Liquid membranes are brushed or rolled onto the prepared substrate, usually in two coats. They are convenient for walls with awkward shapes, niches and pipework, and can be an efficient option for smaller shower areas. Coverage rates and drying times must be followed closely. Applying a coat too thinly, or tiling before it has cured, weakens the finished system.
Sheet membranes offer a controlled, consistent waterproof layer and are often preferred where rapid installation or higher-specification performance is required. The sheets are bonded to the substrate with a compatible adhesive, while overlaps, seams and corners are sealed according to the system instructions. They can be particularly effective in wet rooms and larger commercial bathrooms, where repeatable detailing is valuable.
Avoid mixing products simply because they are available. A membrane, tape, internal corner, sealant and adhesive designed to work as one system gives clearer installation guidance and a more reliable route if a warranty is needed. This is especially relevant when a project has multiple trades and programme pressure.
The key components of a shower tanking system
A complete system normally includes a waterproof membrane, reinforcing tape for board joints and changes of direction, pre-formed internal and external corners, and pipe collars or sealing grommets. These details are not optional extras. Corners and penetrations are the places water most often finds its way behind a tiled finish.
For wet rooms, the system also needs to connect securely to the shower drain or linear channel. Select a drain designed for tiled floors and compatible with the proposed waterproofing method. The membrane must be sealed into the drain flange so water reaching the layer beneath the tiles still flows to the waste rather than into the floor construction.
Prepare the substrate before waterproofing
Waterproofing cannot correct an unstable, dusty or uneven background. Remove loose material, old adhesive residues and surface contamination. Fill holes and repair cracks, then check the walls with a straightedge. Large-format porcelain tiles and rectified edges demand particularly flat surfaces if the finished installation is to look precise.
Prime the substrate when the membrane manufacturer requires it. Primers control suction and improve adhesion, especially on porous boards, plastered walls and cement-based backgrounds. Let the primer dry fully before beginning the tanking process.
Plan the setting-out before applying the membrane. Decide where full tiles will sit, how niches will align with grout joints and where trims are required. This avoids cutting into a finished waterproof layer later to alter a detail that should have been resolved at the layout stage.
How to waterproof tiled showers step by step
Begin by fitting and securing the tile backer boards, leaving the correct gaps between boards and at changes of plane. Use the specified screws and washers, and make sure fixings are flush rather than proud of the surface.
Apply waterproof tape at every board joint, internal corner and wall-to-floor transition. With a liquid system, bed the tape into the first coat of membrane, pressing it firmly so there are no voids or wrinkles. Seal around pipe outlets with purpose-made collars. A bead of sealant alone is not a substitute for a collar beneath the tiles.
Next, coat the full shower area with the waterproof membrane. Work methodically from top to bottom and maintain the required coverage rate. Most systems need two coats applied in different directions, which helps achieve complete coverage. Keep the tanking layer continuous across the walls and down to, or over, the shower tray edge as specified.
In a wet room, waterproof the entire shower floor and take the membrane up adjoining walls. The precise height depends on the system and room design, but the shower zone must be protected well beyond the immediate spray area. Confirm that the floor has a consistent fall towards the drain before waterproofing. Trying to create the fall with tile adhesive is poor practice and can leave an uneven tiled surface.
Once the membrane has cured, inspect it under good light. Look for missed areas, pinholes, damaged corners and incomplete seals around outlets. On higher-risk or commercial projects, a flood test may be appropriate before tiling, provided the construction and drainage arrangement allow it. Rectifying a fault at this stage is straightforward compared with removing finished tiles later.
Tile with materials suited to a wet area
Use a flexible cement-based tile adhesive suitable for the tile type, substrate and shower environment. Porcelain tiles have low porosity and need an adhesive with strong bonding performance. For large-format tiles, back-buttering as well as applying adhesive to the wall can help achieve the necessary coverage and reduce voids behind the tiles.
Voids are a concern in shower areas because they can hold moisture and leave tiles less well supported. Use the correct trowel size and periodically lift a tile to check adhesive contact. On floors, work carefully around the drain so cuts are accurate and the fall remains effective.
Choose a quality grout suitable for bathrooms, then allow it to cure before sealing any changes of plane. Grout helps finish and protect the joints, but it does not replace the membrane underneath. Corners, wall-to-floor junctions, the joint between tiles and the shower tray, and areas around sanitaryware should be finished with a mould-resistant sanitary silicone rather than rigid grout.
Match the silicone colour to the grout where possible for a considered, premium finish. Allow for movement around shower trays and in timber-framed constructions. A neatly tooled silicone joint is both a visual detail and a practical part of the waterproofing strategy.
Common failures to avoid
The most expensive shower repairs usually come from small omissions rather than dramatic mistakes. Tiling directly onto unprotected plasterboard, skipping tape at board joints, using grout in corners and relying on surface sealers are all familiar causes of moisture damage.
Stone tiles bring an additional consideration. Natural stone may need a suitable sealer to protect its face from staining and make routine cleaning easier, but sealer does not make the installation waterproof. The tanking layer is still essential, while the adhesive and grout must be compatible with the chosen stone.
Do not rush the drying stages. Primer, membrane, adhesive, grout and silicone each have their own curing period. A bathroom programme may be tight, but using the shower too soon can affect adhesion and leave joints vulnerable. The final handover should include care guidance, particularly for abrasive cleaners that can damage grout or silicone over time.
Specify the system before choosing the finish
The design choices in a shower - from a slim porcelain slab effect to decorative ceramic walls and a tiled wet-room floor - should sit on a technically sound installation system. Confirm the substrate, shower format, tile size, drainage detail and waterproofing method before ordering the finishing materials. It reduces waste, avoids delays and helps ensure that trims, boards, adhesives, grout and sealants are all available when needed.
At Smart Tiles, a coordinated selection of tiles and installation materials helps homeowners, designers and contractors make those decisions with confidence. A well-chosen tile deserves more than a beautiful surface finish: it deserves a shower construction that stays dry, stable and dependable behind it.