Article: How to Install Mosaic Sheet Tiles Properly
How to Install Mosaic Sheet Tiles Properly
A mosaic can make a shower niche, kitchen splashback or feature floor feel carefully specified rather than simply tiled. However, the smaller the individual pieces, the more obvious any unevenness becomes. To install mosaic sheet tiles successfully, the background must be flat, the adhesive must be appropriate for the material, and each sheet needs careful alignment before it is pressed into place.
Mosaic sheets save time compared with fixing every piece separately, but they do not remove the need for precision. The mesh or paper backing holds the design together, yet it can also conceal small variations in spacing. Good preparation and measured working are what create the clean, continuous finish associated with a professionally installed surface.
Plan the Mosaic Layout Before Mixing Adhesive
Begin by checking the tile sheets in daylight and sorting them by batch where necessary. Natural stone, handmade-effect ceramic and some decorative glass mosaics can show intentional variation in tone, texture and size. Blending sheets from several boxes before fixing helps distribute this variation across the installation rather than concentrating it in one area.
Measure the surface and identify its centre lines, focal points and edges. On a splashback, this may mean centring a feature panel beneath a cooker hood. In a shower enclosure, it may mean ensuring the mosaic runs evenly around a niche or aligns with larger-format field tiles. Avoid leaving narrow, awkward cuts at highly visible edges where possible.
Dry lay a section on a clean, level surface first. This reveals the true module size of each sheet, including the grout joints between them. Do not assume the stated sheet size will determine every joint exactly. If the mosaics sit on mesh, check that the gap between adjacent sheets will match the joints within the sheet. Small adjustments at this stage prevent a visible grid effect later.
Prepare a Flat, Suitable Background
Mosaic sheet tiles follow the profile beneath them more closely than larger tiles. A wall that appears acceptable for a 600 x 300 mm porcelain tile may still show dips and ridges through a small-format mosaic. Check the substrate with a straightedge and correct imperfections before tiling.
For internal walls, use a sound, clean and dry tile backer board, suitable plastered wall or properly prepared existing tiled surface. In wet areas, use a suitable tanking system on the relevant substrate before fixing. Standard plasterboard should not be relied upon as the finished waterproof layer inside a shower enclosure.
Floors need particular attention. The base must be rigid enough to prevent movement, level enough to support every mosaic piece and suitable for the intended load. Cement-based boards, properly prepared screeds and stable concrete floors are common backgrounds. Timber floors often require a compatible tile backer board and an appropriate flexible fixing system. Always allow new screeds, levelling compounds and waterproofing products to cure fully in line with their technical guidance.
Remove dust, grease, loose paint and friable material. Prime absorbent or dusty backgrounds where the adhesive manufacturer requires it. This is not an optional cosmetic step: uncontrolled suction can shorten working time and weaken adhesive contact.
Choose Adhesive for the Tile and Location
The adhesive should be selected for the mosaic material, the substrate and whether the area is dry, wet, heated or subject to movement. A quality white, flexible cement-based adhesive is a dependable choice for many ceramic, porcelain and light-coloured stone mosaics. White adhesive is especially useful behind translucent glass or pale finishes, where grey adhesive may alter the finished appearance.
Not every mosaic can be fixed with a standard cement adhesive. Some glass mosaics, moisture-sensitive natural stones and mosaics with resin, metal or shell components have specific fixing requirements. Check the tile manufacturer’s recommendation before purchase and before work begins. A beautiful surface is only as reliable as the complete installation system behind it.
Use an adhesive with sufficient flexibility where underfloor heating, timber-based construction or minor substrate movement is a consideration. For mosaics in shower areas, select products intended for wet environments and ensure the waterproofing, adhesive and grout are compatible.
Spread Adhesive in Small, Controlled Areas
Mix adhesive exactly to the manufacturer’s stated ratio and allow it to stand, if required, before remixing. Only prepare enough that can be used within its stated pot life. Conditions on site matter: warm rooms, underfloor heating, direct sunlight and highly absorbent backgrounds can all reduce working time.
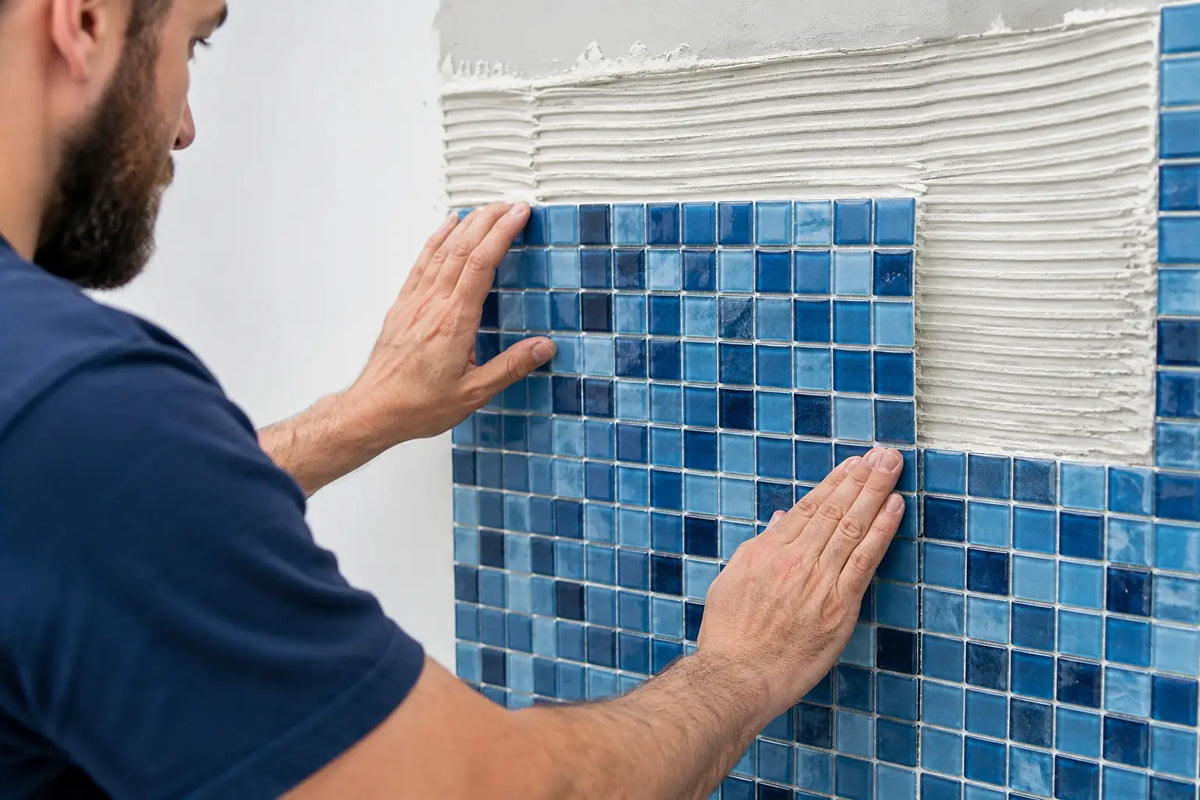
Use a small notched trowel appropriate to the mosaic thickness, often a 3 mm or 4 mm notch. Spread adhesive evenly, then flatten the ridges with the smooth side of the trowel. This is particularly important when fitting thin mosaics or glass sheets. Deep grooves can telegraph through the joints and create visible adhesive lines behind transparent pieces.
Work on an area small enough to tile while the adhesive remains fresh and tacky. If a skin forms on the adhesive, remove it and apply a fresh layer rather than attempting to fix over it. Pressing tiles into skinned adhesive can leave poor coverage and later failures.
How to Install Mosaic Sheet Tiles Without Sheet Lines
Set the first sheet to your marked guide lines, checking it is level and square. Use a clean grout float, rubber beating block or similar flat tool to press the entire sheet evenly into the adhesive. Do not use your fingertips alone, as this can push individual pieces too deeply and create an undulating face.
Place the next sheet alongside it and inspect the joint between the two sheets before bedding it fully. Adjust individual mosaic pieces where needed to match the internal joint spacing. This is the key detail that prevents the finished surface looking like a series of squares. Tile spacers can help at sheet edges, but visual checking remains essential because mesh-backed mosaics vary between designs.
Continue to check the face of the installation with a straightedge. The objective is full adhesive contact and a consistently flat tiled surface, not simply a sheet that appears secure. Clean any adhesive that rises into the joints while it is still fresh. Hardened adhesive in narrow mosaic joints makes grouting slower and less consistent.
Where mosaic meets larger-format tiles, plan the transition carefully. A trim may provide a neat external edge, while a movement joint or colour-matched silicone sealant is normally required at internal corners and where wall meets floor. Grout should not bridge movement-prone changes of plane.
Cutting Mosaic Sheets Cleanly
For simple cuts through the backing, use scissors or a sharp knife between individual tiles. This is often all that is needed at the start or end of a row. For cuts through ceramic or porcelain pieces, a wet tile saw with a suitable diamond blade gives the cleanest result, particularly for repeated edge cuts.
Glass mosaics may need a specialist glass blade, while natural stone should be cut with a blade suited to stone. Always test on an offcut first. Small pieces can chip more easily than large tiles, and the cut edge may be highly visible around a niche, socket or external corner.
Around pipes and outlets, it is often better to cut several small pieces neatly than to force one difficult cut. Keep sufficient clearance around pipes and fill the gap with an appropriate flexible sealant where required, rather than rigid grout.
Allow the Adhesive to Cure, Then Grout Carefully
Do not rush to grout. Adhesive needs adequate curing time before joints are filled, particularly on floors or in cool conditions. Refer to the product guidance, as drying time varies by adhesive type, tile density and room conditions.
Choose grout based on the joint width, tile material and use of the area. Fine-joint grouts suit many mosaics, while stain-resistant and water-repellent options are valuable in kitchens, bathrooms and commercial settings. With porous stone or textured mosaics, test the grout and cleaning method first. Some materials may need sealing before grouting to avoid staining or pigment retention.
Apply grout diagonally across the mosaic with a rubber float, pressing it fully into every joint. Work in manageable sections and remove excess promptly with a lightly damp sponge. Rinse the sponge frequently, using clean water, and avoid over-wetting the joints. Excess water can weaken the grout surface or cause uneven colour as it dries.
Once the grout has firmed, polish away any remaining haze with a dry microfibre cloth. Leave perimeter joints, internal corners and interfaces with baths, shower trays or worktops free of grout. Finish these with a suitable sanitary silicone in a matching shade after the tiled surface has cured.
Common Problems and How to Avoid Them
The most frequent issue with mosaics is sheet lines, caused by inconsistent gaps between sheets. Prevent them through dry laying, guide lines and adjusting individual pieces before the adhesive sets. Uneven sheets usually result from ridged adhesive or pressure applied in isolated spots, which is why flattening trowel ridges and using a grout float are worthwhile.
Adhesive showing through glass is another avoidable problem. Use the recommended white adhesive, create a smooth adhesive bed and maintain consistent coverage. For translucent or especially delicate mosaics, a small test board is sensible before committing to a full wall.
Finally, do not treat every decorative mosaic as interchangeable. A porcelain mosaic floor in a bathroom, a polished stone splashback and a glass feature wall each have different requirements for slip resistance, sealing, adhesive and maintenance. Checking these decisions at specification stage reduces waste and avoids delays once fitting has started.
For a finish that looks considered from every angle, give mosaic tiles the same attention you would give a premium surface finish: establish a flat background, choose the complete fixing system carefully and take time to align every sheet. Smart Tiles can help bring those practical details together with the tile, grout, trims and installation materials needed for a confident result.